How to add Google Ads conversion tag using Tag Manager
In this article, we will go through a step-by-step setup of Google Ads conversion tracking using Google Tag Manager capabilities.
Here you will find information on:
- Where to find Google Ads conversion tag
- How to add it to your website’s “Success” page using Google Tag Manager
Create Google Ads conversion
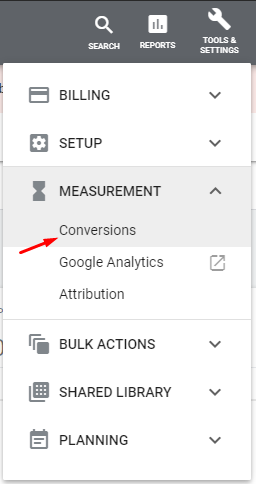
If you haven’t created a conversion tag in your Google Ads account, it can be easily done by going to “Tools & Settings” in the top menu section.

Then, from Measurement section select “Conversions”
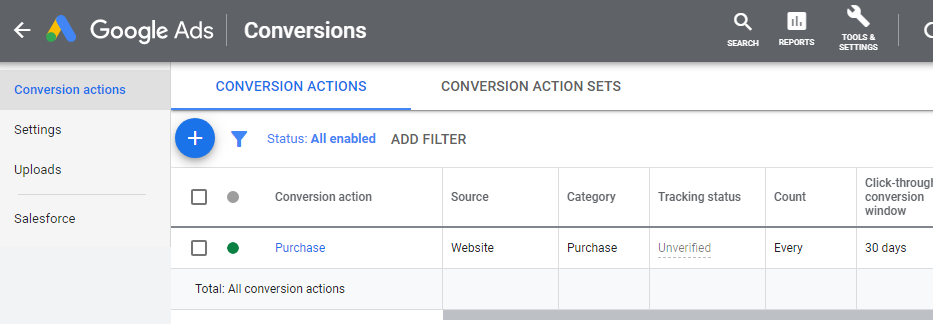
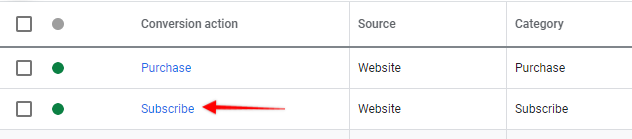
If you already have some conversion actions created, and have a similar view as in the screenshot below, you can skip the creation of new conversion and click on the action that you want to add to your website.
But first I will show how to create a new one.
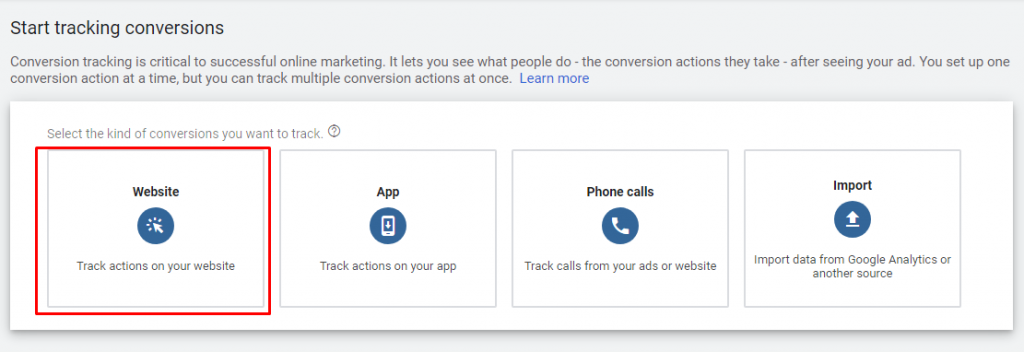
So, if you don’t have any conversions added yet, Google Ads will offer to add one straight away. You will have several options to pick from, and we will go with “Website” as we want to track useful actions on the website.
Next, you will see a bunch of settings you can adjust for your new conversion.
First, you can pick a relevant category of your valuable action. I will use “Subscribe” in my case, but this doesn’t affect your tracking in any way regardless of selected option.

Then you can set conversion name. Be sure to use something descriptive so that you understand what are you tracking with this goal.
In the section named “Value” you can decide if you want to assign any monetary value to your conversion.
- Use the same value for each conversion – Will do what it says, all conversions will have the same static value. It could be used when tracking leads, signups or thank-you pages.
- Use different values for each conversion – This will be useful if you have an ecommerce store where you might have different purchase values each time. If you pick this option, you need to specify purchase value in Google Tag Manager tag to have values recorded correctly.
- Don’t use a value for this conversion action – Will not use any monetary values for this conversion
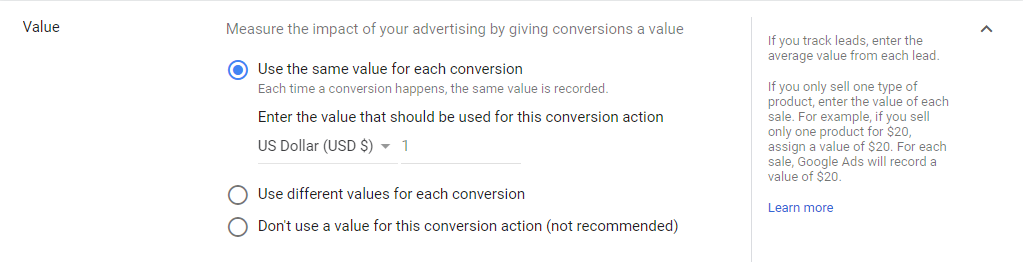
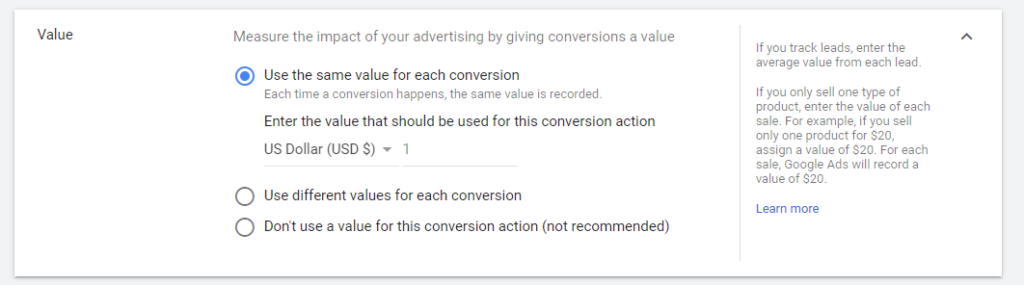
I will use the same value as we are going to install conversion tag on a “Thank you” page.
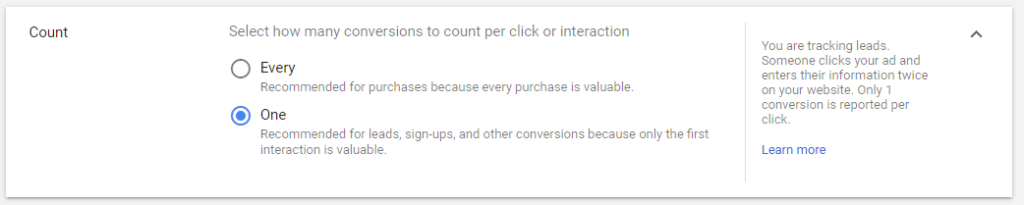
Next, we can select how we want to count our conversions – Each time they happen or only unique occurencies. For example, if you track contact form submissions as conversions then you would be interested to count it only once as additional applications from the same visitor don’t bring you any value.
On the other hand if a visitor multiple purchases you want to count them all, as any additional purchase brings you some value.
Lastly, you have more advanced options to adjust Conversion windows and attribution model. I would recommend to stick with the default values until you feel confident that you need longer click-through conversion window or why last click attribution might not the best approach for conversion tracking in Google Ads.
When you are ready, click on “Create and Continue”.

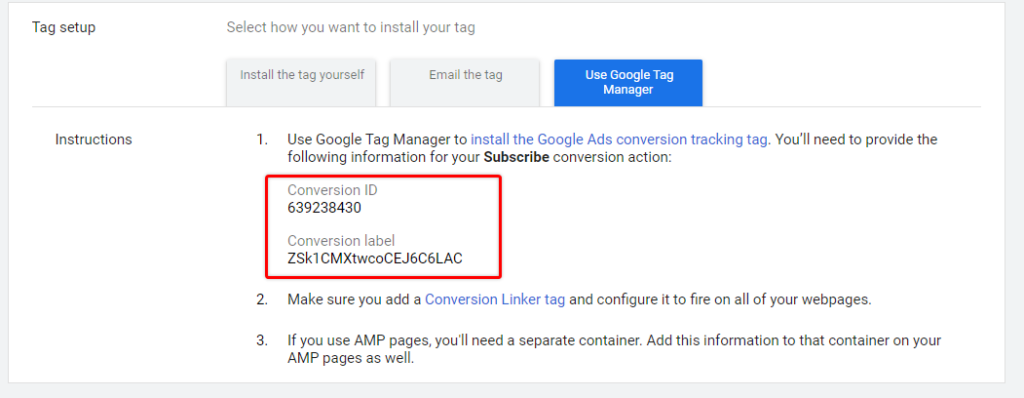
Now you will see 3 options how you can add conversion tag, select – Google Tag Manager.

You will need a Conversion ID and Conversion label values and we will copy them into Google Tag Manager tag settings.
If you already have existing conversion
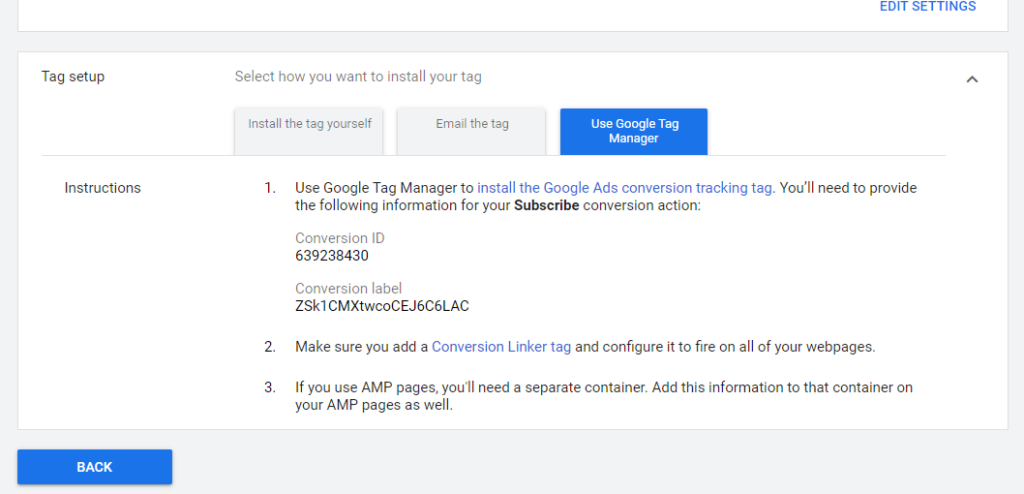
Under the same section Tools > Conversions you can click on any existing conversion that you have added previously.
Then find block named “Tag setup” and click on “Use Google Tag Manager”.
Same information with Conversion ID and Conversion Label should appear that is needed to add Google Ads Conversion tag.
Create a conversion tag in GTM
Now we have all information that we need from Google Ads, it’s time to create setup in Tag Manager.
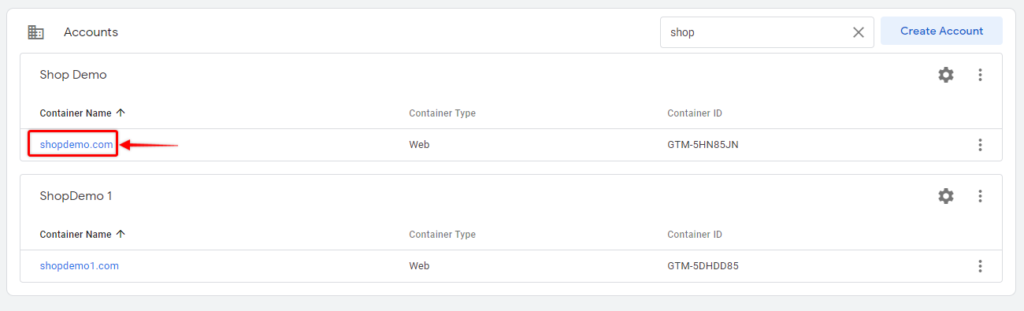
Open your GTM workspace by going to https://tagmanager.google.com/ and clicking on your website container.
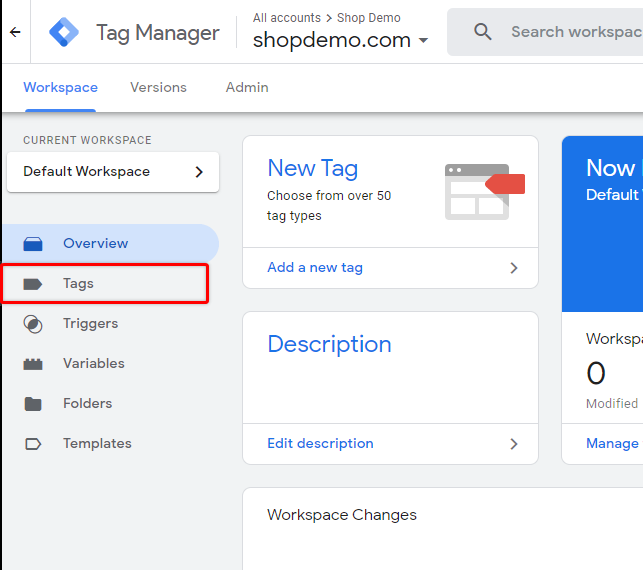
Then navigate to the Tags section from the left menu.
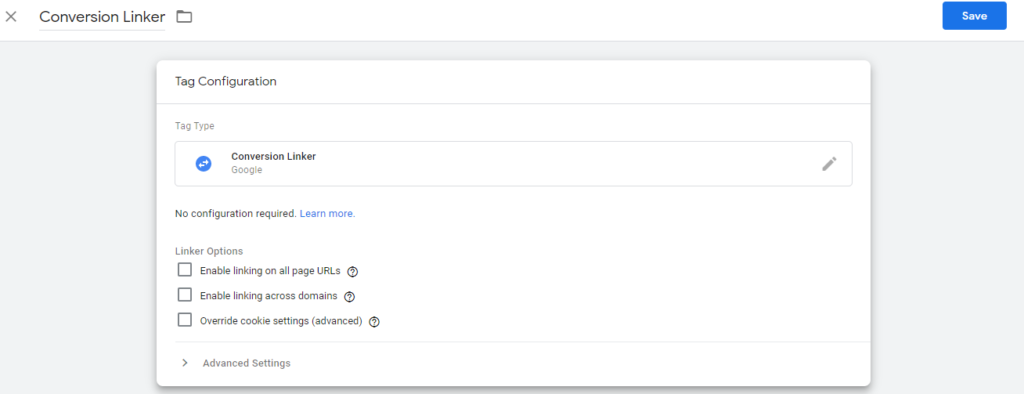
First, we will create a conversion linker tag so that our conversions are recorded corretly.
Click on “New” button to add new tag.

Rename it to Conversion Linker and from Tag configuration select “Conversion Linker”.
You should see similar view as in the screenshot below:
Now click on “Triggering” below and select “All Pages”
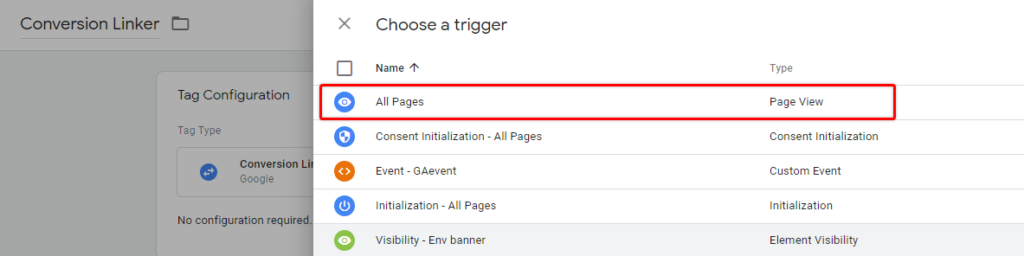
We don’t need to change anything else here as it requires no special configuration, so let’s click “Save”.
Finally, we need to create a Google Ads conversion tag itself, so click on “New”, and name your tag – “Google Ads – Conversion tag”. You can be also more specific if you already have or you plan to have multiple conversion tags on your website.
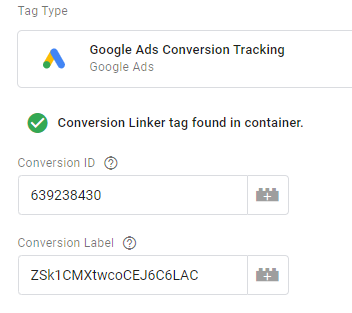
From “Tag Configuration” select – “Google Ads Conversion Tracking” and you should see same screen as I have here:

As you have probably guessed, here we will add Conversion ID and Conversion Label that we saw in our Google Ads settings into the respective fields.
Let’s copy those values now, and you should have something similar:
We don’t need to provide “Conversion Value” or “Transaction ID” when we are tracking only “Success” pages or another conversion not related to purchase so I will skip those, but in general, if you want to have that information in Google Ads – this is where you can set them.
Now most responsible part of our setup is to correctly provide a “Success” page URL for our Google Ads conversion tag. Click on “Triggering” and then click “+” icon to create a new trigger:

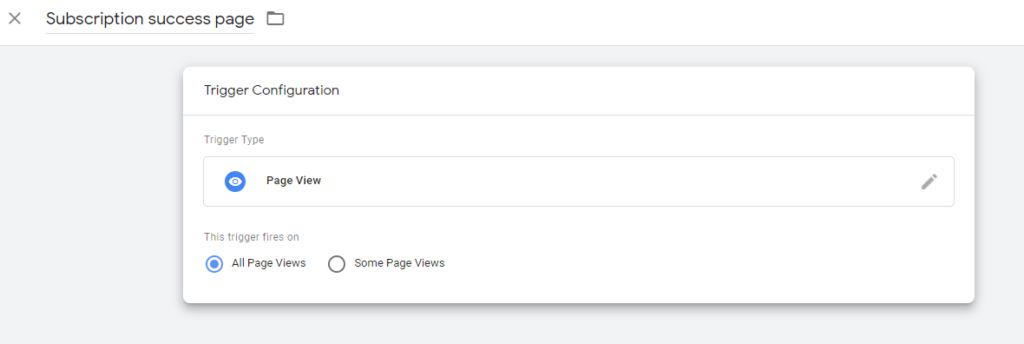
Let’s name it after the conversion that we are tracking. In my case I’m tracking subscriptions so I will name it – “Subscription success page”.
From “Trigger configuration” select “Page View” and the settings should look like this so far:
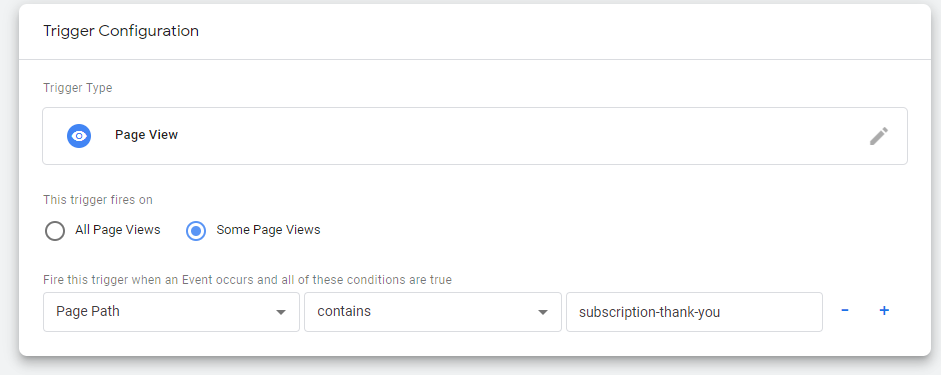
Under the section “This trigger fires on” select “Some Page Views” and from the first dropdown select “Page Path”, because we are interested in launching a conversion tag only on specific page that we provide.
In the second checkbox select “Contains” as matching condition, and in the third checkbox we need to provide part of the URL that idicates your “Success” page.
For example if you complete a subscription and you see an example.com/subscription-thank-you as your success page URL, then in this field you will provide “subscription-thank-you” (without the quotes).
The end result should look similar to this:
Now you can save the trigger and then Save the tag.
In your workspace overview, you should see 2 new tags and one new trigger. You can publish then LIVE if you feel confident that provided URL is correct by clicking “Submit” in the top right corner.

If you want to test your tag before publishing, you can click “Preview” and then check if it works on the confirmation page that was provided.
And that’s basically it!
Here we covered the easiest scenario of how to add Google Ads conversion tag using Google Tag Manager where we have a success page after valuable action on the website. There are scenarios where we don’t have any distinct page loaded after a user completes a form or a purchase, and in those cases, we need to use a custom dataLayer event to trigger the conversion tag. This would require a bit more complex approach that would involve website developers as well and I hope to cover it in one of the next articles related to Google Ads.
