
CSS selectors in Google Tag Manager – a practical guide
CSS selectors are a core part of Google Tag Manager and I would say this is one of the most important skills that you need to learn if you work with GTM very often. In GTM you need CSS selectors for targeting elements on the website to trigger an event on a particular action (e.g. click or view), or extract some dynamic data.
If you haven’t worked a lot with CSS selectors, this short guide will hopefully give you more clarity. We will also go through some practical examples of the most common use cases.
What are CSS selectors?
CSS selectors are a set of rules (or patterns) to select elements on the website. In programming CSS selectors are used for applying styles for HTML elements.
Think of CSS selector as an address. To find an object that you are searching for you need to have a correct address. If address is wrong you might find nothing or it might lead you somewhere you didn’t want to be in the first place. CSS selectors in programming (and in Google Tag Manager) is just a set of rules how to correctly define address of an element on your page – a button, form, navigation link, etc.
For example, when you create a website layout in HTML you need to write CSS rules about how those elements will be positioned on the page, what color they will be in, the dimensions of an element, etc.
A simple example of a CSS rule:
a.navigation {
  color: black;
  font-size: 20px;
}
In the example above a.navigation is a CSS selector and values contained in the curly brackets are formatting rules.
Where CSS selectors are used in GTM?
If you want to target any element from the website either for interaction tracking or to extract any dynamic data – most likely you will need to use CSS selectors to do it more efficiently.
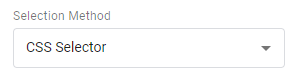
Usually, you have the option to provide a CSS selector in your targeting settings in a tag, variable, or trigger.
For triggers you can usually select “Click Element” as your variable and “Matches CSS selector” as the condition:

In tags and variables you have an option to provide either ID attribute or CSS selector from the dropdown.
Let’s take a look at the most common places in GTM where CSS selectors will be most useful.
CSS selectors in GTM triggers
Click triggers
The most common trigger types where CSS selectors are used are the Click triggers.
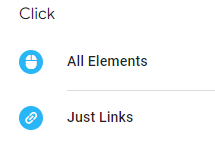
You can target any element on the website and fire an event when a visitor clicks on it.
For e.g. if you want to trigger an event every time somebody clicks on a link with the class name “navigation” you could use this set of rules.

I’ve seen many GTM implementations where a Click text or other workarounds are used where a simple CSS selector would suffice. Learning some element targeting basics would be most beneficial for setting up any click-based triggers.
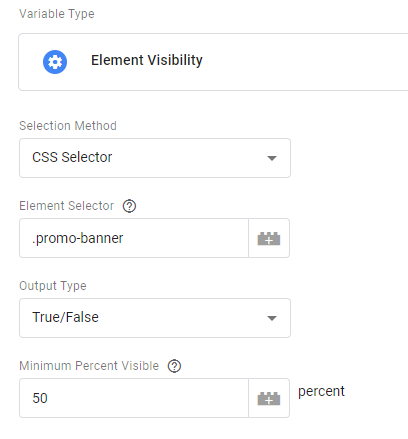
Element visibility triggers
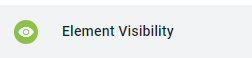
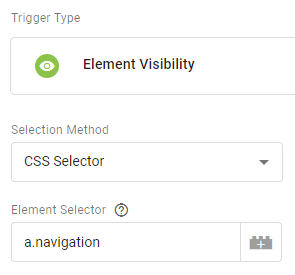
Another trigger type where a CSS selector will be required is Element visibility. You have an alternative option to trigger an event based on the ID attribute, but most often it is not available when needed.
To target element visibility based on the CSS selector, you need to pick the selection method as shown below and provide a selector query.
I have a separate blog post about Element visibility triggers you can check that out.
Form submission triggers

Using CSS selectors you can also target a form where you want to track submissions.
Usually, it will be a “Form Element” with a “matches CSS selector” rule.

GTM variables
DOM Element variable

Using DOM Element you can get any element from the website by providing an ID or CSS selector.
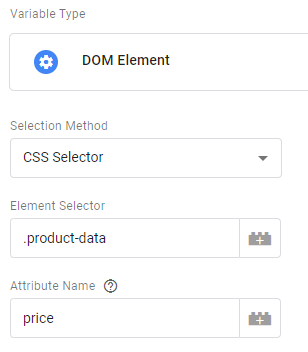
There is a separate post dedicated to the DOM Element variable. You can read it if you want to learn more.
Element Visibility variable

You can use a CSS selector to get element visibility status or percentage using this variable type.
Custom JavaScript variable

When you need to extract some information that couldn’t be accessed by the DOM Element variable you might need to use CSS selectors in the Custom JavaScript variable as well.
GTM tags
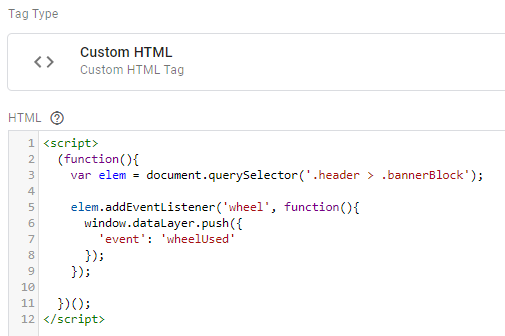
From the default tag types, CSS selectors could be used in custom HTML tags querying website elements. You could either extract necessary information or trigger event based on non-standard actions like mouse wheel scroll, copy/paste events, etc.
CSS selector cheatsheet for GTM
There are some CSS patterns and methods that are used more often than others. In my subjective list below I ordered them by “popularity”, starting with the most common. We will go through each example one by one.
Using Inspect mode
Before we start looking at examples you need to know how to view website HTML source code and inspect elements that we are interested in. If you already know how to do that, just skip to the next section.
The easiest method so far is by using the browser’s built-in “Inspect mode”. To Inspect any element just right-click on it and select “Inspect” from the menu.
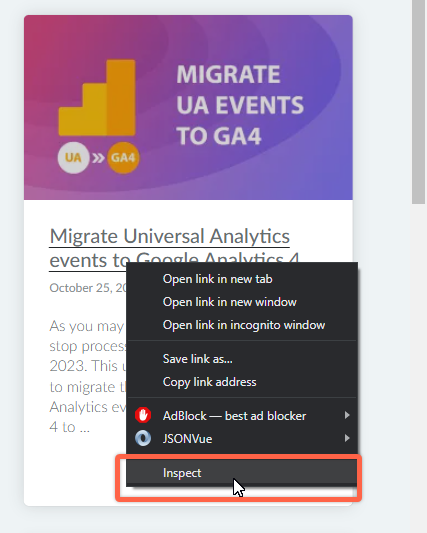
This will open a developer console showing the HTML code of your page and highlighting inspected elements.
You can use it to easily find elements in HTML, check what attributes you can find attached (for CSS selectors), or search for parent or child elements.
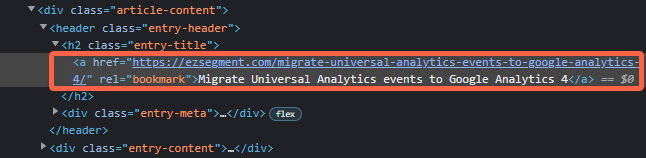
Parent elements will be any elements indented more to the left. In the example above a parent element for the link would be H2 with the class name “entry-title”.
Sometimes HTML structure and attribute values may be different on mobile devices versus desktops. When inspecting your elements it is helpful to preview the website on different screen sizes to make sure your CSS selectors are working for those scenarios as well.
You can easily switch between different device screen sizes using this button in the developer console:

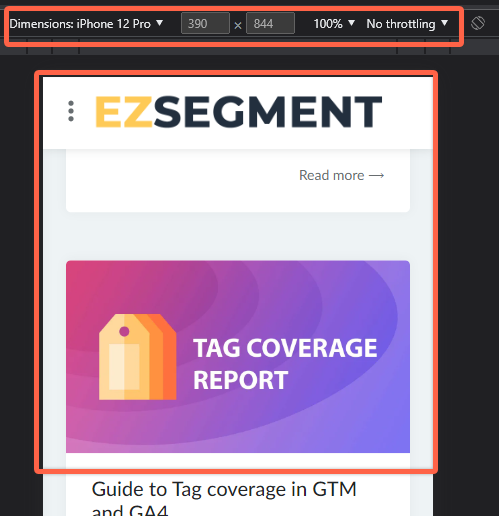
This screenshot is from Chrome, but you will see a similar option in other major browsers too.
Class name selectors
Class name selector example:
.article-contentThe most common way how you can target an element on the website is by using a class name.

A class name value is stored in the HTML element “class” attribute (see screenshot above). Often elements may have multiple class names which are divided by a space.

In the example above we have a link (anchor HTML element) with 2 class names – “skip-link”, and “screen-reader-text”.
By adding a dot before any class name you will create a CSS selector that points to any element with a given class name.
The syntax for using any class name as a CSS selector:
.<class-name>The link from the example above could be targeted using any of the following two CSS selectors:
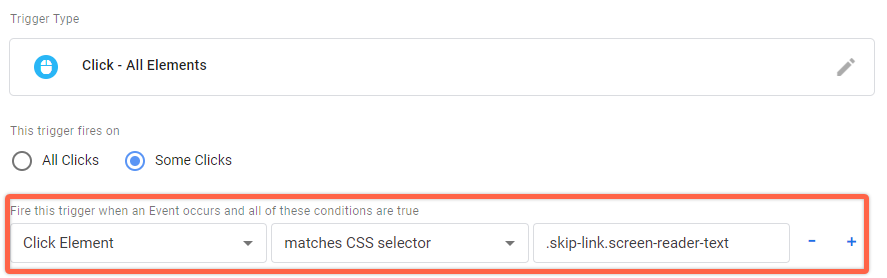
.skip-link
.screen-reader-text
We can also combine all class names provided for the same element to make the targeting rule more accurate (without spaces):
.skip-link.screen-reader-textThis is how this rule would look in GTM click trigger:
NB! If your CSS selector matches multiple elements on the page then it might lead to unexpected results. Avoid using a single class name in CSS selector unless you are certain it’s unique per page or website. Class names can usually be combined or used together with parent selectors to ensure correct targeting.
Usually, most HTML elements have a class name, so even if it’s not unique for a selected element, you can combine multiple of them to target what you need (as shown above).
Element Descendant and Child selectors
Since same class names can be used multiple times on different element we might need to provide more information about where targeted element is located in the DOM. In the context of Google Tag Manager in most of the use case you will need a CSS selector that targets only 1 element. For example – specific CTA button click tracking, when certain banner is shown on the page, on specified form submit, and so on.
Selecting descendant of a parent element
Let’s take a look at the example:
<div class="product-card">
  <div class="add-to-basket-cta">Add to basket</div>
</div>
<div class="related-products">
  <div class="related-product">
    <div class="add-to-basket-cta">Add to basket</div>
  </div>
</div>
We want to add Click event to “Add to basket” button from a product description page, and we can see that button has a class name of “add-to-basket-cta”.
If we use just the class name selector we would also trigger an event when Related product “Add to basket” button is clicked (which we don’t want):
.add-to-basket-ctaSo, to target only button which is located inside “.product-card” element we can add it before button class name selector and divide by space like shown below:
.product-card .add-to-basket-ctaYou can use this method when multiple elements contain the same class name but have different “parents”. It would also work if your target element is not direct child of a parent. For example:
<div class="product-card">
  <div class="product-description">
    <div class="add-to-basket-cta">Add to basket</div>
  </div>
</div>
Learning only these 2 concepts – class name selectors + descendant selectors would already give you a huge variety of elements that you can target using Google Tag Manager.
Selecting direct child of an element
If you want to target only a direct child of any element you can do that by adding a “>” symbol between 2 classnames (or other selector types).
Example with multiple Add to basket buttons under same parent element:
<div class="product-card">
  <div class="product-description">
    <div class="add-to-basket-cta">Add to basket 1</div>
  </div>
  <div class="add-to-basket-cta">Add to basket 2</div>
</div>
To select only “Add to basket 2” button, you could use following CSS selector (direct child):
.product-card > .add-to-basket-ctaElement ID selectors
Same as with class names we can search for an “id” attribute of an element and create a CSS selector by adding # before the name. For example if we have following HTML element:

We can target it by using this CSS selector:
#main-articleID attribute is most likely to be unique on the page, so you might not need to use other parent/child combinations showed above. In Google Tag Manager you often have an option to provide an ID value instead of CSS selector, so this might not be used very often.
Element type selectors
Sometimes different element types are using same attribute values (e.g. class name). Element type is essentialy a HTML tag name and we can use it in CSS selectors without any additional prefixes.
For example if we have a list of these elements:
<div class="text"></div>
<h2 class="text"></h2>
<p class="text"></p>
we can select each one of those using following CSS selectors:
div.text
h2.text
p.text
We are just using HTML tag name and adding a class name. We can also use them without any other attributes to select all elements with that tag name on the page.
div
h2
p
Element attribute selectors
Sometimes elements don’t have a distinct class name or ID. In these cases we can use any other atttributes attached to HTML element.
For example, we have following links on the website:
<a href="https://www.facebook.com/testPage/">Link 1</a>
<a href="https://www.instagram.com/testPage/">Link 2</a>
<a href="https://www.twitter.com/testPage/">Link 3</a>
To select only Instagram link I could use following CSS selector:
a[href="https://www.instagram.com/testPage/"]Another example:
<a href="#" data-value="link-1">Link 1</a>
<a href="#" data-value="link-2">Link 2</a>
<a href="#" data-value="link-3">Link 3</a>
To select only Link 3 we could use following selector:
a[data-value="link-3"]The general syntax for selecting any attribute that exactly matches provided value is this:
[attribute="value"]So it is possible to use these selector types without any tag name or class name provided as well:
[data-value="link-3"]Partial matching for CSS selectors
Sometimes it is useful to select all elements that contains a particular class name or attribute value. For this we can use a variation of atttribute selectors by adding star “*” after attribute name.
Example selector:
a[data-value*="link"]This selector would target the first 3 links below:
<a href="#" data-value="link-1">Link 1</a>
<a href="#" data-value="link-2">Link 2</a>
<a href="#" data-value="link-3">Link 3</a>
<a href="#" data-value="other">Link 4</a>
There are multiple other options for partial matching in CSS selectors. You can use “starts with”, “ends with” and other matching types.
Note that you can use this also for class names in the same way as for attributes.
a[class*="link"]Selector above would target all links where any of the classnames contain value of “link”. So Link 1 and 2 in this example.
<a href="#" class="link-1">Link 1</a>
<a href="#" class="glowing-link sale">Link 2</a>
<a href="#" class="glowing">Link 3</a>
<a href="#" data-value="link-4">Link 4</a>
Combining multiple CSS selectors
Sometimes you might need to trigger same event when multiple different elements are clicked. One way is to create multiple different triggers with different CSS selectors, but you can also combine them into one by using a comma.
Let’s say we want to trigger an event when any of these elements are clicked:
<a href="#" class="link-1">Link 1</a>
<div class="main-banner"></div>
<div class="main-banner-2"></div>
<h2>Some title</h2>
<div class="cta-button">Sign up</div>
We know how to select them separately or some of them, so we can combine that into a single CSS selector like this:
.link-1, [class*="main-banner"], h2, .cta-buttonAnd this is how it could look like in your GTM trigger.

Summary and next steps
We have covered the main components and syntax examples for CSS selectors (in my subjective view) and how those can be used in Google Tag Manager. There are more selector types out there which are used less frequently and you can learn more about them on MDN website.
As I mentioned above, this is one of the most useful skills you might have when working with frontend Google Tag Manager. The more you practice using CSS selectors the more easier it will be for you to add events nearly to any element on your or your client’s website.
I hope this was not too overwhelming and let me know if the comments if you’ll have any questions!

Great!