Mouse Hover tracking in Google Tag Manager and Google Analytics 4
Sometimes you need to understand if a specific block is getting any visitor attention on your website and one of the measurable indicators could be how often visitors are hovering their mouse cursor over the block.
In this short post, we will take a look at how to add mouse hover tracking in Google Tag Manager and Google Analytics 4 to any website element.
Starting with a code template
Since mouse hover is not available in Google Tag Manager as a default trigger we will need to use JavaScript to trigger a dataLayer event. I’ve prepared a simple code template that we will use in a custom HTML tag.
<script>
(function(){
  var cssSelector = "section.main-about";
  var dlEventName = 'elementHover';

  var targetElement = document.querySelector(cssSelector);

  if(targetElement) {
    var eventTimout;
    var eventTimout2;
    var eventTimout3;

    targetElement.addEventListener('mouseenter', function(){
      eventTimout = setTimeout(function(){ sendEvent(5, dlEventName); }, 5000);
      eventTimout2 = setTimeout(function(){ sendEvent(10, dlEventName); }, 10000);
      eventTimout3 = setTimeout(function(){ sendEvent(30, dlEventName); }, 30000);
    });

    targetElement.addEventListener('mouseleave', function(){
      clearTimeout(eventTimout);
      clearTimeout(eventTimout2);
      clearTimeout(eventTimout3);
    });
  }

  function sendEvent(duration, event) {
    window.dataLayer.push({
      'event': event,
      'hoverDuration': duration
    });
  }

})();
</script>
Let’s take a quick look at what this code does by splitting it into parts.
Defining the hover target element
At the very top, we use CSS selectors to define what element we want to add hover tracking for.
var cssSelector = "section.main-about";In the first example, we will take a look at how to add tracking to a single website element. In the extended example, we will fetch multiple elements at the same time.
If you don’t know what CSS selectors are and how to work with them in GTM, check this guide.
Adjusting dataLayer event name
On the top, you also have the option to adjust the data layer event name. You can either leave it as it is or use your own name. This will be used for a trigger that will activate the GA4 event tag.
var dlEventName = 'elementHover';In my example, “elementHover” is the data layer event name that will be available in GTM once elements are hovered. You can read more on how dataLayer works in GTM if you haven’t worked with that before.
Define how long elements should be hovered before event fires
In the next block, if our target element exists, we are listening for “mousenter” and “mouseleave” events.
If a visitor hovers a mouse over an element for consecutive 5 seconds – the first hover event is sent to dataLayer.
When the visitor hovers for 10 seconds or 30 seconds – additional events are sent to dataLayer.
targetElement.addEventListener('mouseenter', function(){
      eventTimout = setTimeout(function(){ sendEvent(5, dlEventName); }, 5000);
      eventTimout2 = setTimeout(function(){ sendEvent(10, dlEventName); }, 10000);
      eventTimout3 = setTimeout(function(){ sendEvent(30, dlEventName); }, 30000);
    });

    targetElement.addEventListener('mouseleave', function(){
      clearTimeout(eventTimout);
      clearTimeout(eventTimout2);
      clearTimeout(eventTimout3);
    });
  }
You can adjust the time of thresholds by editing duration in milliseconds. For E.g. 5000 in the example below stands for 5 seconds hover time.
eventTimout = setTimeout(function(){ sendEvent(5, dlEventName); }, 5000);To trigger an event after 2 seconds of mouse hovering just change it to 2000 like this:
eventTimout = setTimeout(function(){ sendEvent(2, dlEventName); }, 2000);If you will be using multiple thresholds for the same element, you need to edit the first parameter of the sendEvent() method so that correct values are available in dataLayer.
So this value:
sendEvent(5, dlEventName);Will become:
sendEvent(2, dlEventName);The code below ensures that no events are triggered if a user moved their mouse away from the element before a specified number of milliseconds has passed.
targetElement.addEventListener('mouseleave', function(){
      clearTimeout(eventTimout);
      clearTimeout(eventTimout2);
      clearTimeout(eventTimout3);
    });
If you just want to add hover tracking for one threshold in GA4, leave only 1 “eventTimeout” variable.
The full code example will look like this:
<script>
(function(){
  var cssSelector = "section.main-about";
  var dlEventName = 'elementHover';

  var targetElement = document.querySelector(cssSelector);

  if(targetElement) {
    var eventTimout;

    targetElement.addEventListener('mouseenter', function(){
      eventTimout = setTimeout(function(){ sendEvent(5, dlEventName); }, 5000);
    });

    targetElement.addEventListener('mouseleave', function(){
      clearTimeout(eventTimout);
    });
  }

  function sendEvent(duration, event) {
    window.dataLayer.push({
      'event': event,
      'hoverDuration': duration
    });
  }

})();
</script>
Sending dataLayer event
At the very bottom, we have a method that sends a data layer event and we reuse that for any specified thresholds. In addition to the event name, we are also passing the “hoverDuration” attribute that can be used as a data layer variable in your tags.
function sendEvent(duration, event) {
    window.dataLayer.push({
      'event': event,
      'hoverDuration': duration
    });
  }
Hover tracking tag and variable setup
Once you have familiarized yourself with the template, let’s adjust it and create additional components for our tracking to work.
First of all copy the JS template that was provided above, and in GTM create a new Custom HTML tag:
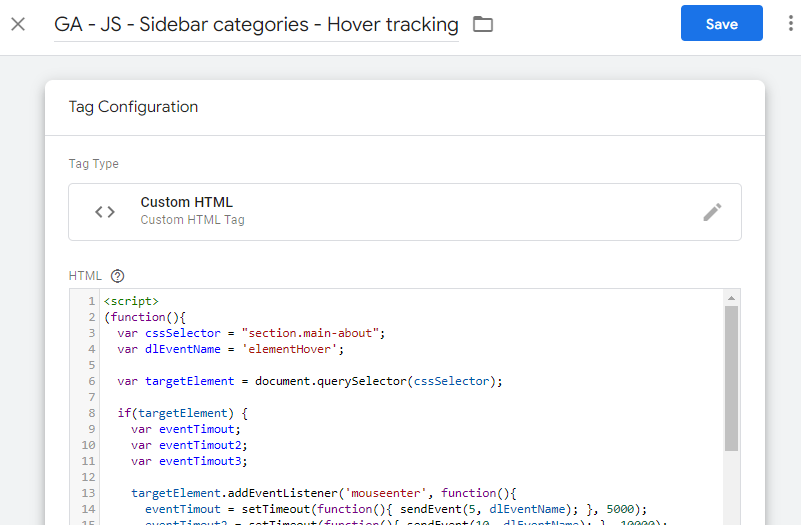
Adjusting the template
The main thing that you need to adjust in any scenario is the CSS selector variable value.
var cssSelector = "section.main-about";Instead of “section.main-about” you should use your own value depending on which element you want to add hover tracking for.
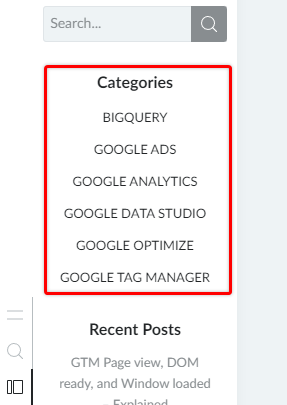
On my website I will track sidebar categories:
So to get the CSS selector I will inspect the element (Right click > Inspect Element). And I can see that I can track whole block hover events using element ID – “categories-2”.
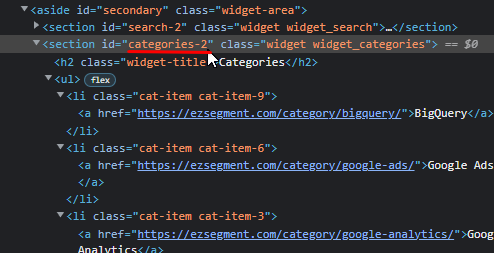
Because this is an ID attribute my CSS selector will be “#categories-2” and I will change the variable value as well:
var cssSelector = "#categories-2";If you didn’t understand what just happened, I highly recommend reading an introduction to CSS selectors that you can find in my blog. I’m using # before the ID name as part of the CSS selector syntax and it will be used by a script to point to the correct element.
Now, for the sake of example, I will also adjust thresholds when the first hover event fires and change it from 5 seconds to 3 seconds. So I need to change 2 values – one that is sent to dataLayer and a second that is used for the timer.
Changing this:
eventTimout = <span class="hljs-built_in">setTimeout</span>(<span class="hljs-keyword">function</span>(<span class="hljs-params"></span>){ <span class="hljs-title function_">sendEvent</span>(<span class="hljs-number">5</span>, dlEventName); }, <span class="hljs-number">5000</span>);To this:
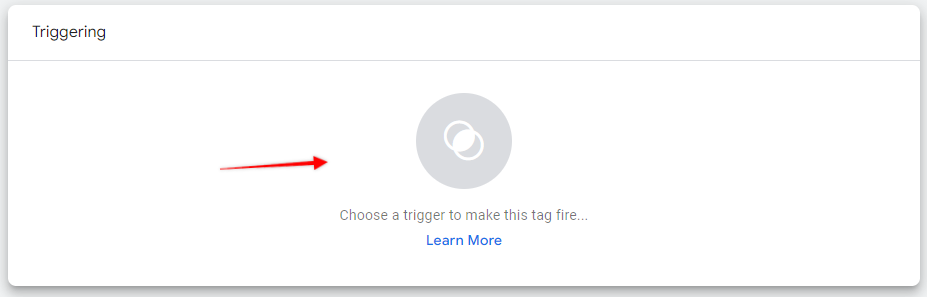
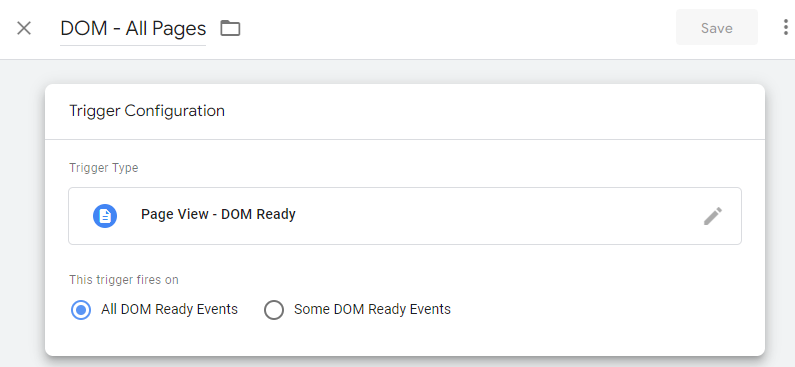
eventTimout = setTimeout(function(){ sendEvent(3, dlEventName); }, 3000);Now, we need to activate the hover tracking script by adding a trigger. Click on “Triggering” and create a new trigger.

We need this tag to be active once the HTML structure has loaded, so from the trigger type select “DOM ready”.

Since my element can be accessed from any page I can heave the default settings and activate it on all pages. If you want to limit it to a specific page just pick “Some DOM Ready Events” and provide additional conditions.
NB! In some cases, your element might not be available when the page fully loads, but only after certain clicks or actions. These scenarios will require you to use visibility or custom dataLayer events to trigger the main element hover tracking script. Make sure to test your implementation properly to make sure everything is running smoothly.
Save the trigger and then save the Custom HTML tag.
Create variables and GA4 event tag for hover event
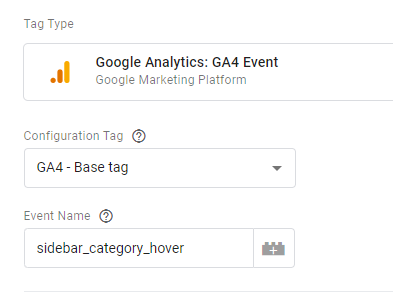
Next, we need to create a GA4 event tag that will capture our hover data layer event. From the Tags section create a new tag with the type “GA4 Event”.

- Select your GA4 configuration tag (if you have set up GA4 via GTM)
- Provide the event name that you would like to see in GA4 reports when the mouse hovers over an element.
I will use “sidebar_category_hover”. Make sure your event name doesn’t exceed 40 characters.
If you are tracking multiple hover duration thresholds you will need to pass this information as an event parameter in GTM.
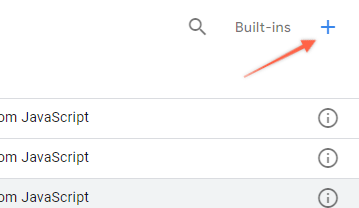
- Add a new event parameter in the same tag. I will call it “hover_duration”.
- To select a value click on the “plus icon”

- Create new variable
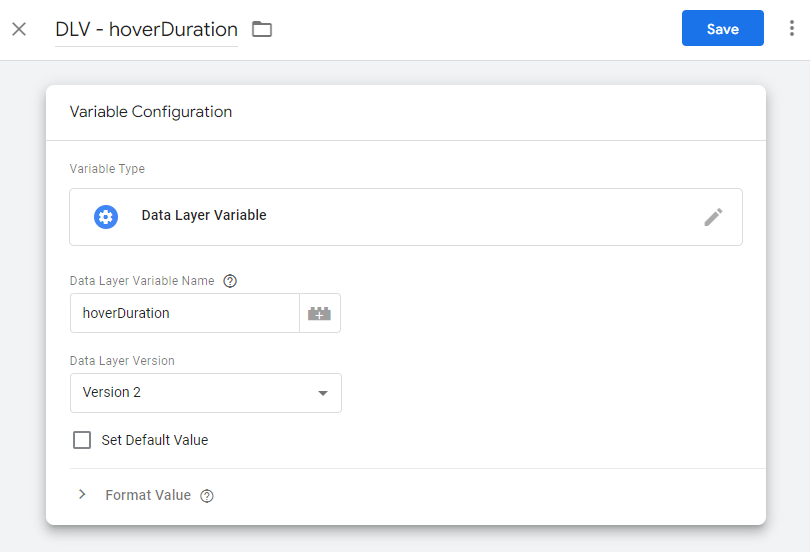
We will use the dataLayer value that was passed in the ‘hoverDuration’ attribute from our Custom HTML tag.
- Select variable type – “Data Layer Variable”
- Provide variable name – “hoverDuration” (exactly the same as in our dataLayer event).
- Save variable
Now it should appear as a dynamic value in the GA4 event tag:

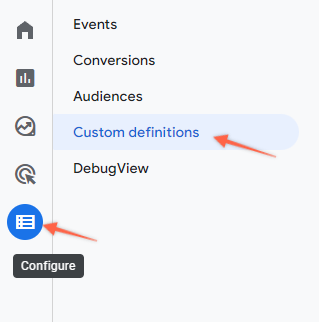
Next, we need to add hover_duration custom dimension in GA4, otherwise, it won’t appear in the reports.
- In the GA4 property open Configure > Custom definitions section
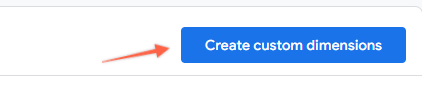
- Click on the “Create custom dimension” button
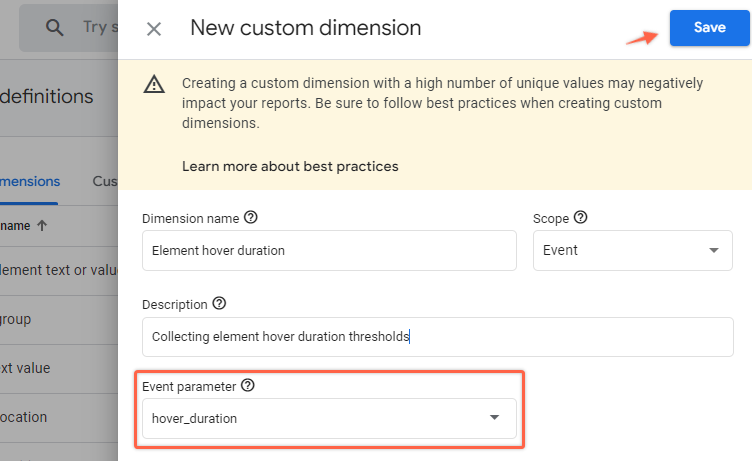
Use the same event parameter name as in GTM configuration – “hover_duration”, and provide descriptive details about this custom dimension. I’m using custom dimensions since I’m interested only in the thresholds for the hover events. If you like, you can also adjust it to work with custom metrics and make additional calculations that are possible only for metrics (e.g. calculate avg. hover duration for specified elements).
Once you save it, go back to GTM and add the last piece of the setup – a trigger.
- Click on Triggering and create a new one
- Select type “Custom Event”
- Use “elementHover” as the event name (or the same that you have used in the custom HTML tag)
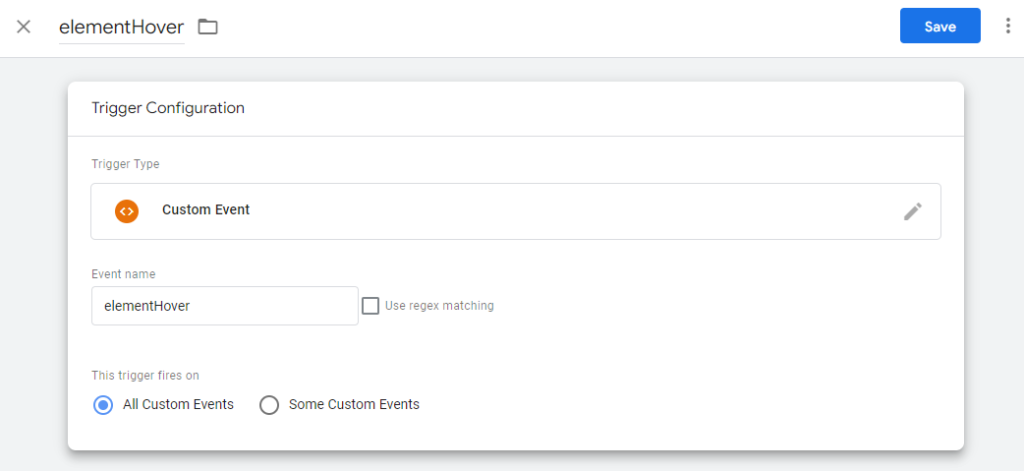
This tag now will trigger each time when hover event occurs and triggers “elementHover” data layer event.
Test implementation
When you have added all the setup in Google Tag Manager and GA4 it’s time to test it. Enable Preview mode in GTM and hover tracked element for at least provided duration threshold.
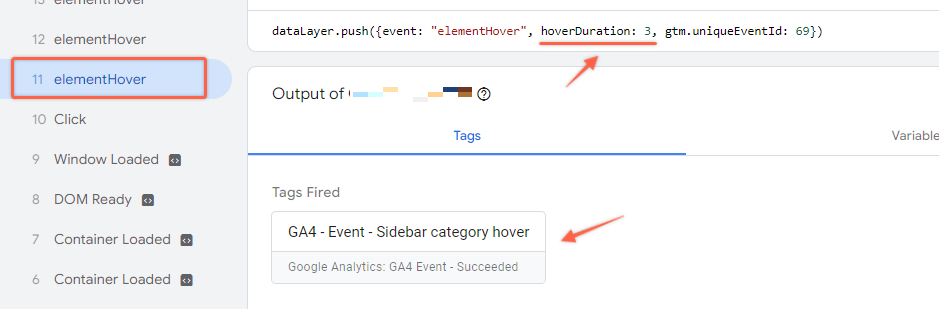
If events worked as expected you should see a separate dataLayer event for each threshold. In my example, there are 3 of them – for 3 seconds, 10 seconds, and 30 seconds.
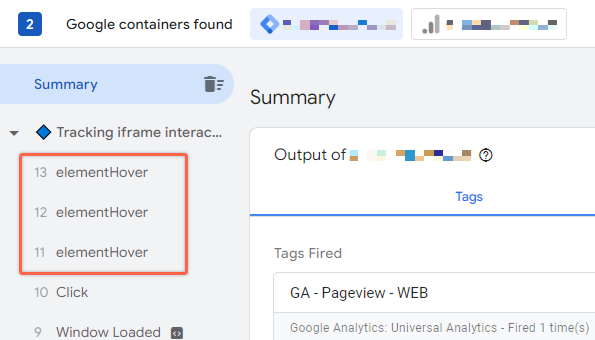
If you click on any of the dataLayer events from the left sidebar, you should see the hover duration value and confirmation that the GA4 Event tag has fired.
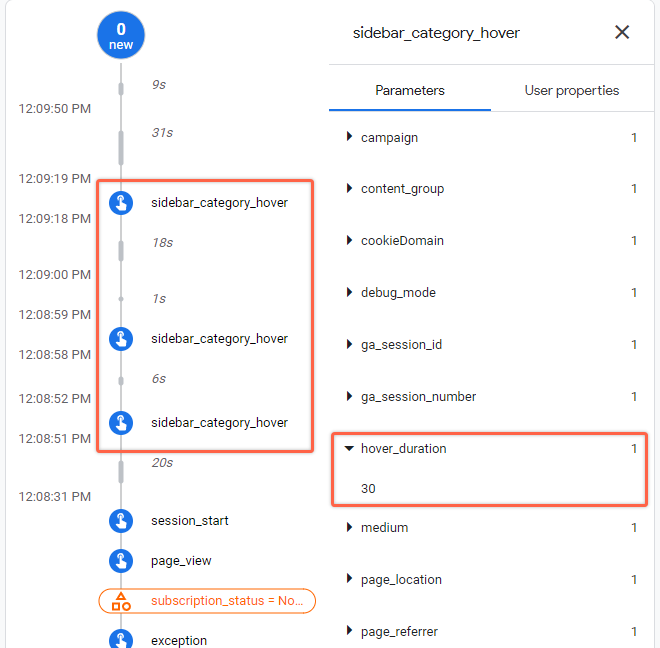
You can also double-check your events in GA4 DebugView by opening Google Analytics 4 property and going to Configure > DebugView. You should see your events in the event timeline and a hover_duration passed as a parameter.
Fixing common issues that you might encounter
If your setup doesn’t work as expected you might have some issues with the edited code template or tag configuration.
If you don’t see any of the events after hovering tracked element check these 2 things:
- if your CSS selector is correct (maybe you are tracking an element that couldn’t be found)
- Check threshold duration, maybe you are not hovering an element long enough.
- Check if the element, where you want to track mouse hover, is available when a page is loaded. If it’s added later, after certain interaction, you will need to trigger the Custom HTML tag after the element was available in the DOM (e.g. using a visibility trigger or another data layer variable)
- for any possible errors in the Custom HTML template (maybe some characters were accidentally removed when editing). Double-check if you see any unexpected differences from the provided template.
If you see a data layer event in preview mode but the GA4 tag is not fired:
- Check if the GA4 custom event trigger is the same as used in a custom HTML template. It should be “elementHover” by default (case sensitive).
Find hover events in Google Analytics 4 reports
After you collect some data you can create a custom Exploration report to view hover count and duration statistics.
Create a new exploration report and include the following dimensions: Event name, Element hover duration (name that you have used for hover_duration dimension).
Include Total users as a metric or Total events if you prefer that better.
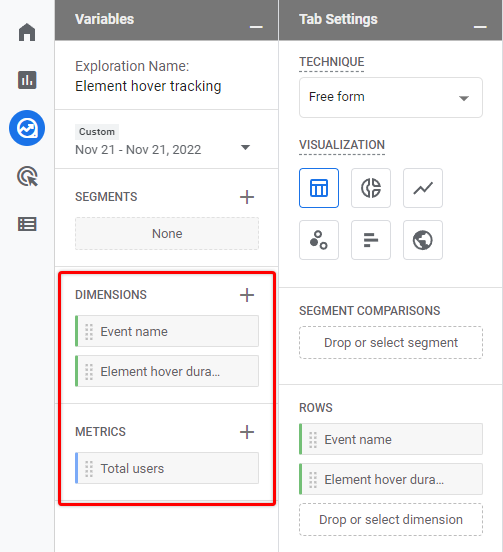
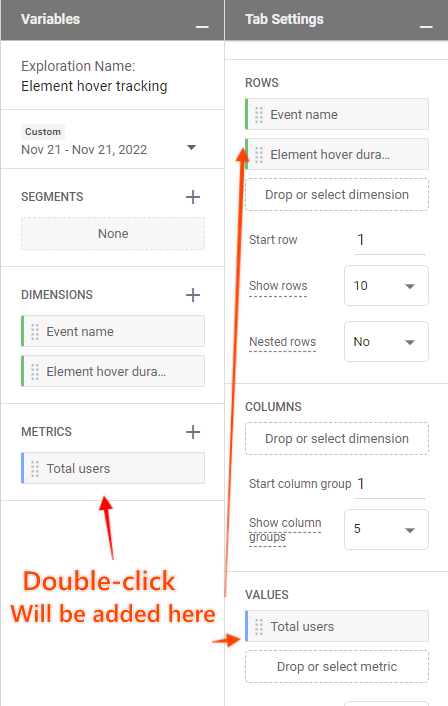
Double-click on all dimensions and metrics from the Variables tab to include them in the report.
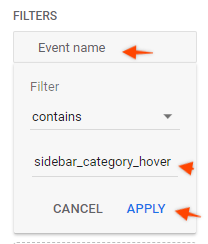
Add your event name as a filter and click Apply.
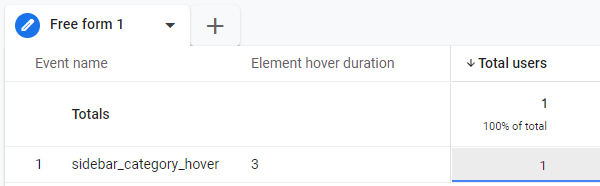
You will then see a report on the right side with the element hover user (or event) count split per hover duration. You will need to wait a day or two after hover tracking implementation before any data will appear in this report.
Track hovering of multiple dynamic elements
There might be cases when you want to track hover for multiple similar elements on the page and maybe check which of those are hovered more often than others. If this is your use case, below is a template that you can use for a Custom HTML tag instead:
<script>
(function(){
  var cssSelector = "a.post-thumbnail img";
  var dlEventName = 'elementHover';
  var elemNameAttribute = "alt"; // change this to the attribute name to differentiate elements.
  // E.g. use "src" to use image source URL

  var targetElements = document.querySelectorAll(cssSelector);

  if(targetElements.length > 0) {
    for(var i=0; i <= targetElements.length - 1; i++ ) {
      addEventsToElement(targetElements[i]);
    }
  }

  function addEventsToElement(targetElement) {
    var eventTimout;
    var eventTimout2;

    targetElement.addEventListener('mouseenter', function(e){
      var elemName = targetElement.getAttribute(elemNameAttribute);
      eventTimout = setTimeout(function(){ sendEvent(2, dlEventName, elemName); }, 2000);
      eventTimout2 = setTimeout(function(){ sendEvent(5, dlEventName, elemName); }, 5000);
    });

    targetElement.addEventListener('mouseleave', function(){
      clearTimeout(eventTimout);
      clearTimeout(eventTimout2);
    });
  }

  function sendEvent(duration, event, elemName) {
    window.dataLayer.push({
      'event': event,
      'hoverDuration': duration,
      'elementName': elemName
    });
  }

})();
</script>
The key changes here are that we are using a CSS selector to target all matching elements and the hover tracking event will include an additional element name parameter.
At the very top you have the ability to adjust the parameter name that will be used as an element unique identifier for reports:
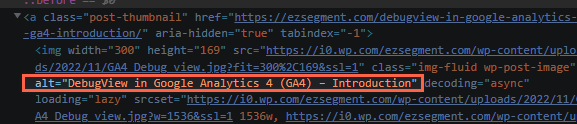
var elemNameAttribute = "alt";In this example, it will fetch the “alt” attribute of a hovered element. You can easily change that to “src” to fetch the image URL or any other parameter. Note that GA4 custom dimensions allow collecting only up to 100 characters, so in case the URL exceeds this limitation it will be trimmed.
You also have an additional parameter in dataLayer called “elementName” that can be passed to GA4 as a custom event parameter (custom dimension) in a similar way that we did with “hoverDuration”.
function sendEvent(duration, event, elemName) {
    window.dataLayer.push({
      'event': event,
      'hoverDuration': duration,
      'elementName': elemName
    });
  }
Summary
Since there is no default hover trigger in GTM yet we have to use custom JS to get hover tracking in place. If you haven’t worked before with CSS selectors or JavaScript it might be a bit overwhelming to make this setup, so hopefully provided examples and explanations will be useful.
Let me know in the comments if you have any questions!
